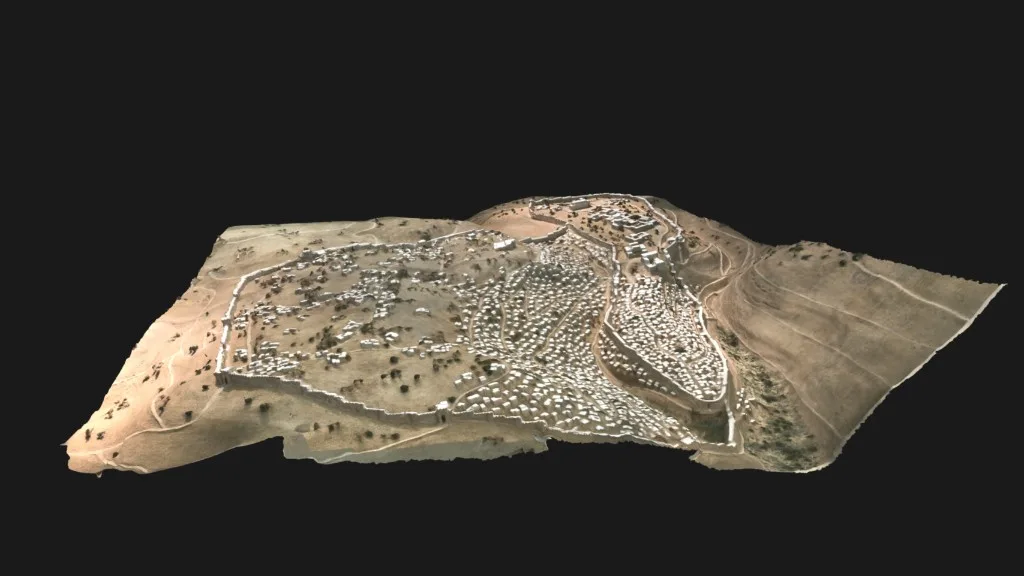
When a flat photo isn’t enough — 3D Models of biblical sites
Add a 3D Models slide in BibleSlides — choose Masada, first-century Jerusalem, Qumran, Egypt artifacts, and more — then orbit, label, and step camera angles so the room sees the place, not a screenshot.
A Bible Photo can put Capernaum on the screen in a heartbeat. Sometimes that is exactly right. Other Sundays the text needs volume: the plateau under Masada, the courts of Herod’s Temple, the caves above the Dead Sea. A JPEG stays flat. The sermon is not.
BibleSlides 3D Models is the slide type for that beat: pick a real model from the catalog, frame the teaching angle once while you study, then advance camera steps from the tablet so the room sees the place as you explain it.
If the congregation only ever sees a cropped photo, they may never feel why “going up to Jerusalem” or “the fortress in the wilderness” mattered in the text.
How this differs from 3D Bible Maps (and from Bible Photos)
You may already use 3D Bible Maps for terrain journeys — Mapbox hills, place labels, and fly-to route steps. 3D Models is a different object: a Babylon.js model of a site, artifact, or reconstruction you can orbit in place.
| Need | Use |
|---|---|
| “Show the climb from Jericho to Jerusalem on a living map” | 3D Bible Maps (terrain + routes) |
| “Show Herod’s Temple courts / Masada’s plateau / a Qumran cave as an object” | 3D Models (authored model slide) |
| “One accurate place photo, then back to the verse” | Bible Photos |
| A quick place glance that was not in the deck | On the fly |
Same family of geography tools. Different pastoral moments. Prep a 3D Model when the object or reconstruction carries the point; use maps when path and elevation on the land carry it.
The pastor’s problem: screenshots age the moment the zoom is wrong
What usually happens:
- You paste a museum photo — helpful, but locked to one angle
- You screenshot a Sketchfab page — soft, watermarked, and hard to advance in sermon order
- You wave at a paper reconstruction — the front row sees nothing useful
None of that matches how you actually teach: “Look at the western approach. Now the temple courts. Now the fortress wall — this is the height Josephus is talking about.”
What 3D Models is
In the editor, add a 3D Models slide. New slides open Choose a 3D Model first. Search works (Masada, Jerusalem, trilobite, and so on). Tabs group the catalog:
| Tab | What you will find |
|---|---|
| Biblical & Archaeological | Sites and artifacts tied to Scripture and the ancient Near East — e.g. Masada Fortress, Caesarea Maritima, Qumran Caves, Sea of Galilee, 1st Century Jerusalem, Hezekiah’s wall |
| Egypt | Exodus-era and Egyptian chronology pieces — pharaohs, temples, scarabs, Valley of the Kings, and related scans |
| Geology | Terrain and fossil models useful when creation, flood, or landform context serves the text |
Pick a card, then continue into the step editor. The modal keeps the cubes icon and 3D Models framing so you are not hunting a buried “Jerusalem only” tool — the catalog is the library; Jerusalem is one of many entries.
Bible Photos, 3D Maps, and 3D Models sit on Premium (new accounts include a 30-day Premium window; Free keeps verse slides and other types after that). Plan for the tier you actually preach on.
Frame once, then step the room through it
Teaching rhythm matches map journeys and verse annotations:
- Orbit to the Home angle that introduces the place
- Add camera steps on the minimap rail in the order you will preach
- Optionally add labels, focus boxes, and overlay arrows on a step when a wall, gate, or court needs a finger on the glass
- Advance step chips from the tablet while you speak
Each step can store its own camera (orbit, distance, target) and an optional heading while that step is active. Home can show the wide view; later steps tighten on the feature you are explaining. You are not replacing sequential exposition of the passage. You are putting the place beat on a slide you can advance, then returning to the Bible Verse slide for the argument of the text.
Keep speaker notes under the slide in the same document — the model serves the outline; it does not become the outline.
A quiet Sunday workflow
- In sermon prep, decide whether the room needs volume and angle as much as a still photo
- Add a 3D Models slide → Choose a 3D Model → search or open the right tab
- Frame Home; add only the camera steps you will name aloud
- Label sparingly — one clear callout beats five competing bubbles
- On Sunday, advance model steps from the tablet; return to Scripture slides for the text itself
If a journey across the land serves better than a single reconstruction, prefer 3D Bible map routes. Models answer object and court; maps answer path and terrain.
When not to use 3D Models
- The verse on screen already carries the point — leave the model closed
- You only need one honest place photo — use Bible Photos
- You need miles of road, not a fortress mesh — use 3D Bible Maps
- You need a quick sketch, not a catalog model — use Board
BibleSlides remains a quiet servant: Scripture first, a 3D model when the place must be seen, then out of the way.
Related guides
See BibleSlides features
Notes and slides in one document, Bible Verse slides, stepped markup, Verse Analysis, 3D maps, BiblePlaces photos, and tablet presenter apps — built for pastors who teach Scripture.